%20final_edited_edited.png)
Crochet Techniques #5: BLOCKING
- Jan 28, 2019
- 9 min read
Updated: Aug 2, 2024
Some people tell me they never block their crochet. This post is to convince you on the merits of blocking and share advice on how to do it. Blocking transforms crochet from a bunchy, rippled or curled fabric to one that is smooth and crisp with softened drape. It allows your crochet to reach its full potential. Who wouldn't want that, right!?
Over many years designing garments and accessories with crochet, I have worked with a variety of fibres and have learned a bit about blocking. Every Peppergoose Design you see showcased in various magazine publications I have blocked applying these techniques.
Blocking advice varies with fibre content of your yarn so lots to cover!

Back in the day....
I get it. It's a bit nerve wracking plunging your pride and joy into uncertain territory. When I was about 11 years old I remember completing my first small lace doily with my Grandmother's help. I felt so enormously proud of myself and what I had made seemed so precious to me, so of course I was horrified when Grandma told me to put it in water (but it would get wet!!?) and press it under a cotton cloth with a steam iron (but it might burn!!!??!). It all sounded very risky, and it was with my heart in my mouth that I followed her instructions. Thankfully it all turned out just fine – here is a little picture as I still have this little make.
Why Block?
Blocking sets the stitches, improves drape, smooths out some little rippled or bunchy areas, absolutely transforms lace work, and sets the garment to dimensions provided in the schematic of your pattern.
The tips I share with you here are just my opinions and the way I do things, but no matter what your technique, blocking is absolutely essential for MOST crocheted garments. (I say most garments, because depending on your fibre, or the function of the fabric, maybe you don’t want to…. Read on!)
Here is how I block a garment...
Let's use an example of a sweater. My photos relate to my square swatch made with Scheepjes Our Tribe so let’s imagine it’s a sweater made with this 70% Merino Superwash and 30% Polyamide blend. I will make some comments about other fibres as I go.
I do not own a blocking board or blocking pins and I have never used them. All I use is a clean laundry sink, a bunch of large towels, my regular ironing board, glass headed pins and my steam iron.

Step 1: WET BLOCKING
This is literally letting your fibres of the fabric become saturated, rinsing thoroughly and laying carefully flat to the desired dimensions until it is dry.
I fill the sink with tepid water (just a little warmth only to my hand – I never measure temperature) to a depth that allows the garment to be fully immersed. I add a SMALL AMOUNT of soap (olive oil soap, wool wash, lux flakes or something gentle) to dissolve in the water and generate a small amount only of suds as seen in the photo below. The soap is needed as a wetting agent for water to fully penetrate the fabric, as otherwise animal fibres will naturally repel water. If it’s a cotton or acrylic garment, you could probably go without the soap in terms of water would still penetrate, but I tend to still use it as and you would use laundry liquid or something similar when you wash the finished garment between wears anyway - so do that.
Immerse the garment and gently push under the surface of the water but do not agitate. Let it sit for 15 mins and reposition so the bits that have been sitting at the top of the water will now be underneath. Let it sit again for 10 mins or so. When the water has fully penetrated all parts of the fabric it will all be dark in colour - if there are light flecks it is where it is not yet saturated. At a minimum have it in the water for 20-25 mins or so but longer great to really soften the fibres.

Once you have finished soaking, bunch the fabric in a clump to one side of sink, hold it there and drain the sink. Avoid lifting it in and out as you do NOT want to stretch the fabric. Refill with plain water, release the fabric from its clump at the side of the sink and gently immerse/swirl to rinse, clump again, drain and repeat (usually once or sometimes twice more) until all suds are gone. Clump, drain, and push in on the clump with both of your hands to squeeze out a bit of water, and scoop-lift it in its clump on to a large thick towel laid flat by the sink. The towel should be big enough for the bodice or main part of the garment to lay flat.
Place the clump on the centre of the towel and gently unfold to an approximate flat position. If there are sleeves, lay them over the bodice without pulling on the length of the sleeve. Put another towel on top and roll them up firmly and squeeze (but do not wring) the rolled towel to squeeze out excess moisture.

Carry the rolled up towel to where you will lay the garment to dry out laid flat. Lay out a new thick towel here, large enough to lay the garment out completely flat including any sleeves.
Unroll the towel with garment, clump the garment to then lift it onto the second towel. This time lay out flat pretty close to the schematic dimensions described by the pattern (get your measuring tape out to check). I do this by laying it out to the specified main fabric stitch and row gauge. The yarn (particularly animal fibres) will tend to spring back to a slightly smaller dimension by the time it is dry but at least this way you know it can comfortably (stretch to) be the desired finished dimensions and the next step of steam blocking will get you the rest of the way if it does spring back.
I tend to lay my garment flat on a large thick towel next to a sunny window and cover the top with a second towel so my cat doesn’t come and sit on it, and the sun doesn’t fade the fabric (though if its a super hot day and I am in a hurry I might put something out in the sun for 2 hrs and it be totally dry - the benefits of a Perth summer. Leave it there until completely dry.

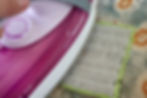
Step 2: STEAM BLOCKING
This is saturating the fibres of the fabric with hot steam and allowing to dry. If your fabric is small (like a granny square maybe) you can pin it out to desired dimension with glass headed pins and steam away, but garments are way too big for this and need to be steamed in sections. I think of this process as Air-Ironing.

Firstly, set the iron temperature to wool if its animal fibres (or blends of animal fibres with a small amount of acrylics), and set to maximum steam. If its cotton, set the iron temperature to cotton (which is significantly hotter).
Much like you move a shirt around the ironing board to make certain sections of it lie flat before you press with the iron, I do the same with my crocheted garment and hover the iron 1 cm above the fabric moving slowly across that section for a few seconds – maybe 5 seconds.
Then I get a stiff A4 piece of cardboard and use it to fan the fabric to accelerate the drying for 10-15 second or so, then reposition and repeat with the next section of the garment. (Make sure any excess fabric hanging off the end of the ironing board has a stool or bench or something to hold it up so the fabric is not stretched dangling all the way to the floor.)
If your garment has a fair proportion of animal fibres in the yarn, you can see the stitches tighten slightly as you hover the steam iron over the fabric (and this becomes strangely hypnotic and addictive, watching it move slightly). This reaction smooths the yarn surface, increasing fabric sheen and improving drape, but also reduces elasticity. So never steam block the ribbing of your animal fibre based sweater if you want it to function as elasticated ribbing (but I would still steam block the bodice).
Sometimes the ribbing is more for show as texture than as an elastic structure, and steam blocking will improve the look and drape of that fabric (eg. anything cotton or acrylic, or maybe a dc ribbing in some circumstances), but I would never steam block raised treble post ribbing made from wool types or alpaca, as I really want this to retain its “spring”.
When to use glass headed pins if you are steam blocking a garment
Mostly I steam block garments without using pins at all. Sometimes though, for the edges (hem, cuff, neckline) of the garment maybe there are some feature lace stitches or a ripple edge that needs some refinement – this is where I would use the glass-headed pins to pin out the detailed edge and gently stroke the fabric away from the pins and steam block that section and reposition and repeat as needed to finish the blocking. The pins need to have glass heads because the steam could melt the plastic of plastic-headed pins.
Don’t place pins in the middle of the fabric as well as the edge; I gently stroke the fabric away from the edge pins instead to avoid kinks/distortions in the middle of the garment left by the pins. Edge pins should be placed pretty close at 1-2cm apart to avoid pulling-in scoop shapes happening to your edge (particularly for animal fibres that will tighten the most with steam blocking).

Now the swatch edges are smooth and squared off. The stitch definition is more distinct and the posts stand more vertically than before blocking. The fabric lays flat without any curled edges and it feels much softer in the hand. Awesome!
Sleeves are a special section for steam blocking – a thin towel, rolled up tight to the approximate (slightly smaller) diameter and (slightly longer) length of your sleeve, gently inserted from shoulder through to cuff provides a round structure to steam block so there are no fold lines. Divide the sleeve circumference into about three sections and steam up and down the length of that section, fan to cool, then gently roll to the new section of sleeve. It's really effective and gives a professional finish to your garments!
This pic shows my Rabbit Alice Sweater cotton version. Made with Scheepjes Whirlette, the top sleeve has been both wet blocked and then (after inserting a small rolled up towel into the sleeve) steam blocked. The bottom sleeve has only been wet blocked and dried. BIG difference!
Once you have steam blocked the entire garment, lay it flat on a fresh towel to cool completely, then it’s good to go!
BLOCKING ADVICE BY FIBRE CONTENT
(in my opinion)...
Mohair– never block at all. Just enjoy.
Silk– never block at all. Just enjoy.
Alpaca– never wet block, but steaming will totally transform your main fabric! I steam block (iron set to “wool”) the main fabric of an alpaca garment to improve fabric drape or make lacework sit well, but do not steam any raised treble ribbing sections or anywhere it should retain its elasticity. Aplaca magically absorbs body odours and somehow doesn’t retain the smell, so unless you spill your dinner on it, it won’t ever need washing!
Merino/Wool– wet block, then steam block (iron set to “wool”) the main fabric as described for Alpaca, and again do not steam block any raised treble ribbing sections. Merino also does the magical odour disappearing act so once you have blocked your garment, washing requirements will be minimal.
~20-40% Acrylic blends mixed with dominant animal fibres – treat as for dominant animal fibre as above; set the iron to "wool" setting for low heat.
Pure Acrylics– wet block only. I don’t work with any pure acrylics myself, but I believe they just go in the washing machine as needed. I think do NOT steam block, as depending on type of acrylic, theoretically it might melt!
Cotton– wet block, then steam block with a hot iron set to “cotton”.
Mercerized Cotton Thread– wet block, then (unless there are textured stitches that need to stand up), press lightly (iron set to “cotton”) under a pressing cloth in sections. Never place iron direct to the fabric as it can scald the fabric, blanching the colour (I learned this the hard way, but at least it was a small item...). If there are textured stitches, then steam block instead.
Okay, ready for some before and afters?
This design is my Chevron Skirt (mini skirt version) crocheted with Scheepjes Whirlette (60% cotton, 40% acrylic) straight off the hook, versus after both wet and steam blocking. Blocking in general and particularly steaming as the finishing touch really allows you to stretch the hemline out and smooth out the bumpy bits!


This shows my Daisy Chain Cardigan crocheted with Scheepjes Metropolis (75% merino extra fine, 25% nylon) before and after wet and steam blocking (though I didn't steam block the cuff and hemline ribbing). You can see the fabric is flatter (softer drape) and the lace definition down the sleeve is much clearer.


This design is my swatch for the Brigitte Lace Tee pattern. The yarn is Scheepjes MAXI Sugar Rush (100% mercerised cotton). Both wet and steam blocking for this one and you can see it totally transforms the lace section.


Wet blocking and then steam blocking allows your crochet to shine to it's full potential and showcase your beautiful hard work. This blog post started with the unblocked sleeve of a red version of my Brigitte Lace Tee and finishes with a fully wet and steam blocked black one. Your stitches may be perfect but the garment they create is not going to drape and wear this well, or lace look this defined, without a good blocking!
I hope you found this useful and feel motivated and empowered to block your crochet!
Happy stitching!
Susannah (Peppergoose)

All advice offered is genuine and my own opinion. There are no affiliate links in this post. Yarn support by Scheepjes.